DoD Certificate Import – User Guide
This section is designed for end-users who need to install Department of Defense (DoD) certificates on their personal or professional devices. These certificates are required to use the Common Access Card (CAC) with DoD applications, websites, and resources.
You will find two methods for installing DoD certificates:
-
Automated Script Method: This method provides a script that automates the installation of DoD certificates. It is ideal for users who want a faster, more streamlined experience and are comfortable running scripts on their device.
-
Manual Method: This approach guides you step-by-step through downloading and installing the certificates yourself. It is suitable for users who prefer to understand and control each step of the process.
Both methods achieve the same result—installing the necessary DoD certificates—but differ in how much manual effort and technical interaction is required.
This guide is designed for macOS Monterey and newer (typically the latest supported macOS versions). Older versions may require additional software or different steps. If you need a guide for an older version, please submit a request on GitHub Discussions.
Automated Script Method
The automated script will:
- Download the latest DoD certificates directly from the official cyber.mil website.
- Guide you through each step using on-screen prompts (osascript dialogs) before proceeding.
- Automatically extract and import the certificates into your System Keychain (not just your user keychain).
- For each Root CA certificate, you will be prompted to enter your password (multiple times) to approve the trust settings.
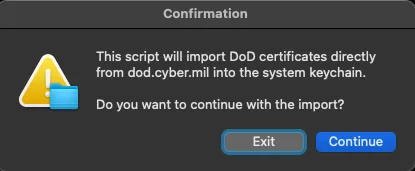
Step 1: Run automated script
Copy and paste the code below into your Terminal.
It will prompt you for your local Mac password to proceed:
sudo bash -c "$(curl -s https://raw.githubusercontent.com/cocopuff2u/MacOS_GOV_Scripts/main/Keychain_And_Certificates_Scripts/Import_DoD_Certs.sh)"
Anytime you run any scripts, it is recommended to review the code beforehand to verify it is not doing anything outside the described steps. You can inspect this one here
Example of the automated import:
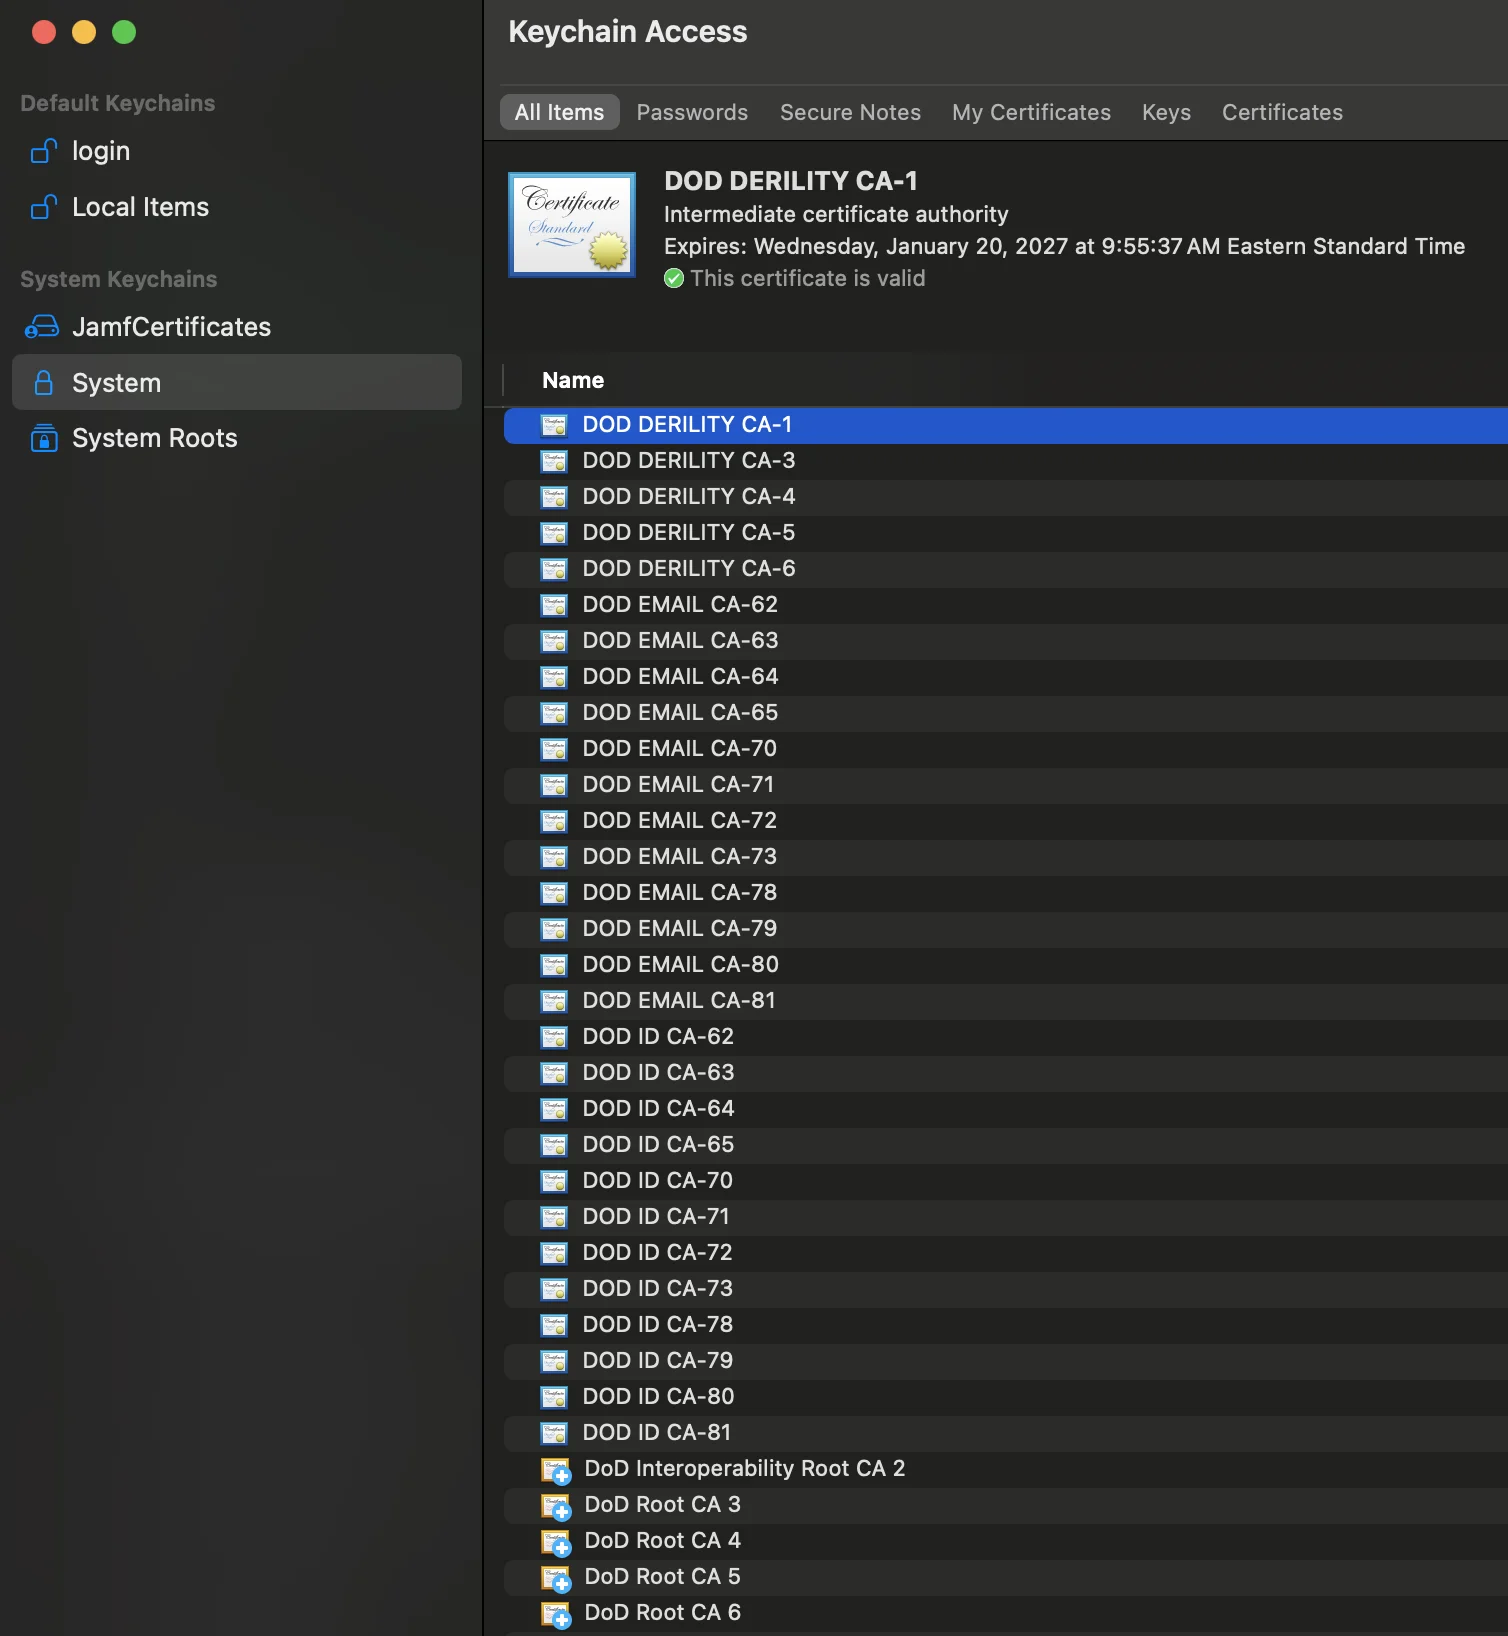
Step 2: Verify DoD Certificates in the System Keychain
After the script completes, you should verify that the DoD certificates have been added to your System Keychain:
- Open the Keychain Access app (use Spotlight search in the top right and type "Keychain Access").
- In the left sidebar, select System under "Keychains".
- In the main window, look for certificates with names containing "DoD", "Root", or "Intermediate".
- Confirm that the certificates are present and show as trusted (no red X or warning icons).
Visual Reference:
| Good (Always Trust) Root CA | Failed Trust Root CA | Root CA (Orange) | Intermediate CA (Blue) |
|---|---|---|---|
 |  |
If you do not see the certificates in the System keychain, re-run the script or consult the troubleshooting section below.
Example of a successful import:
Manual Method
To manually install the required DoD certificates, you will download them from an authorized location, extract the files, import the certificates into your system keychain, and set the trust level for the Root CAs. Follow the steps below, referencing the provided images for each action.
Step 1: Download DoD Certificates from an Authorized Location
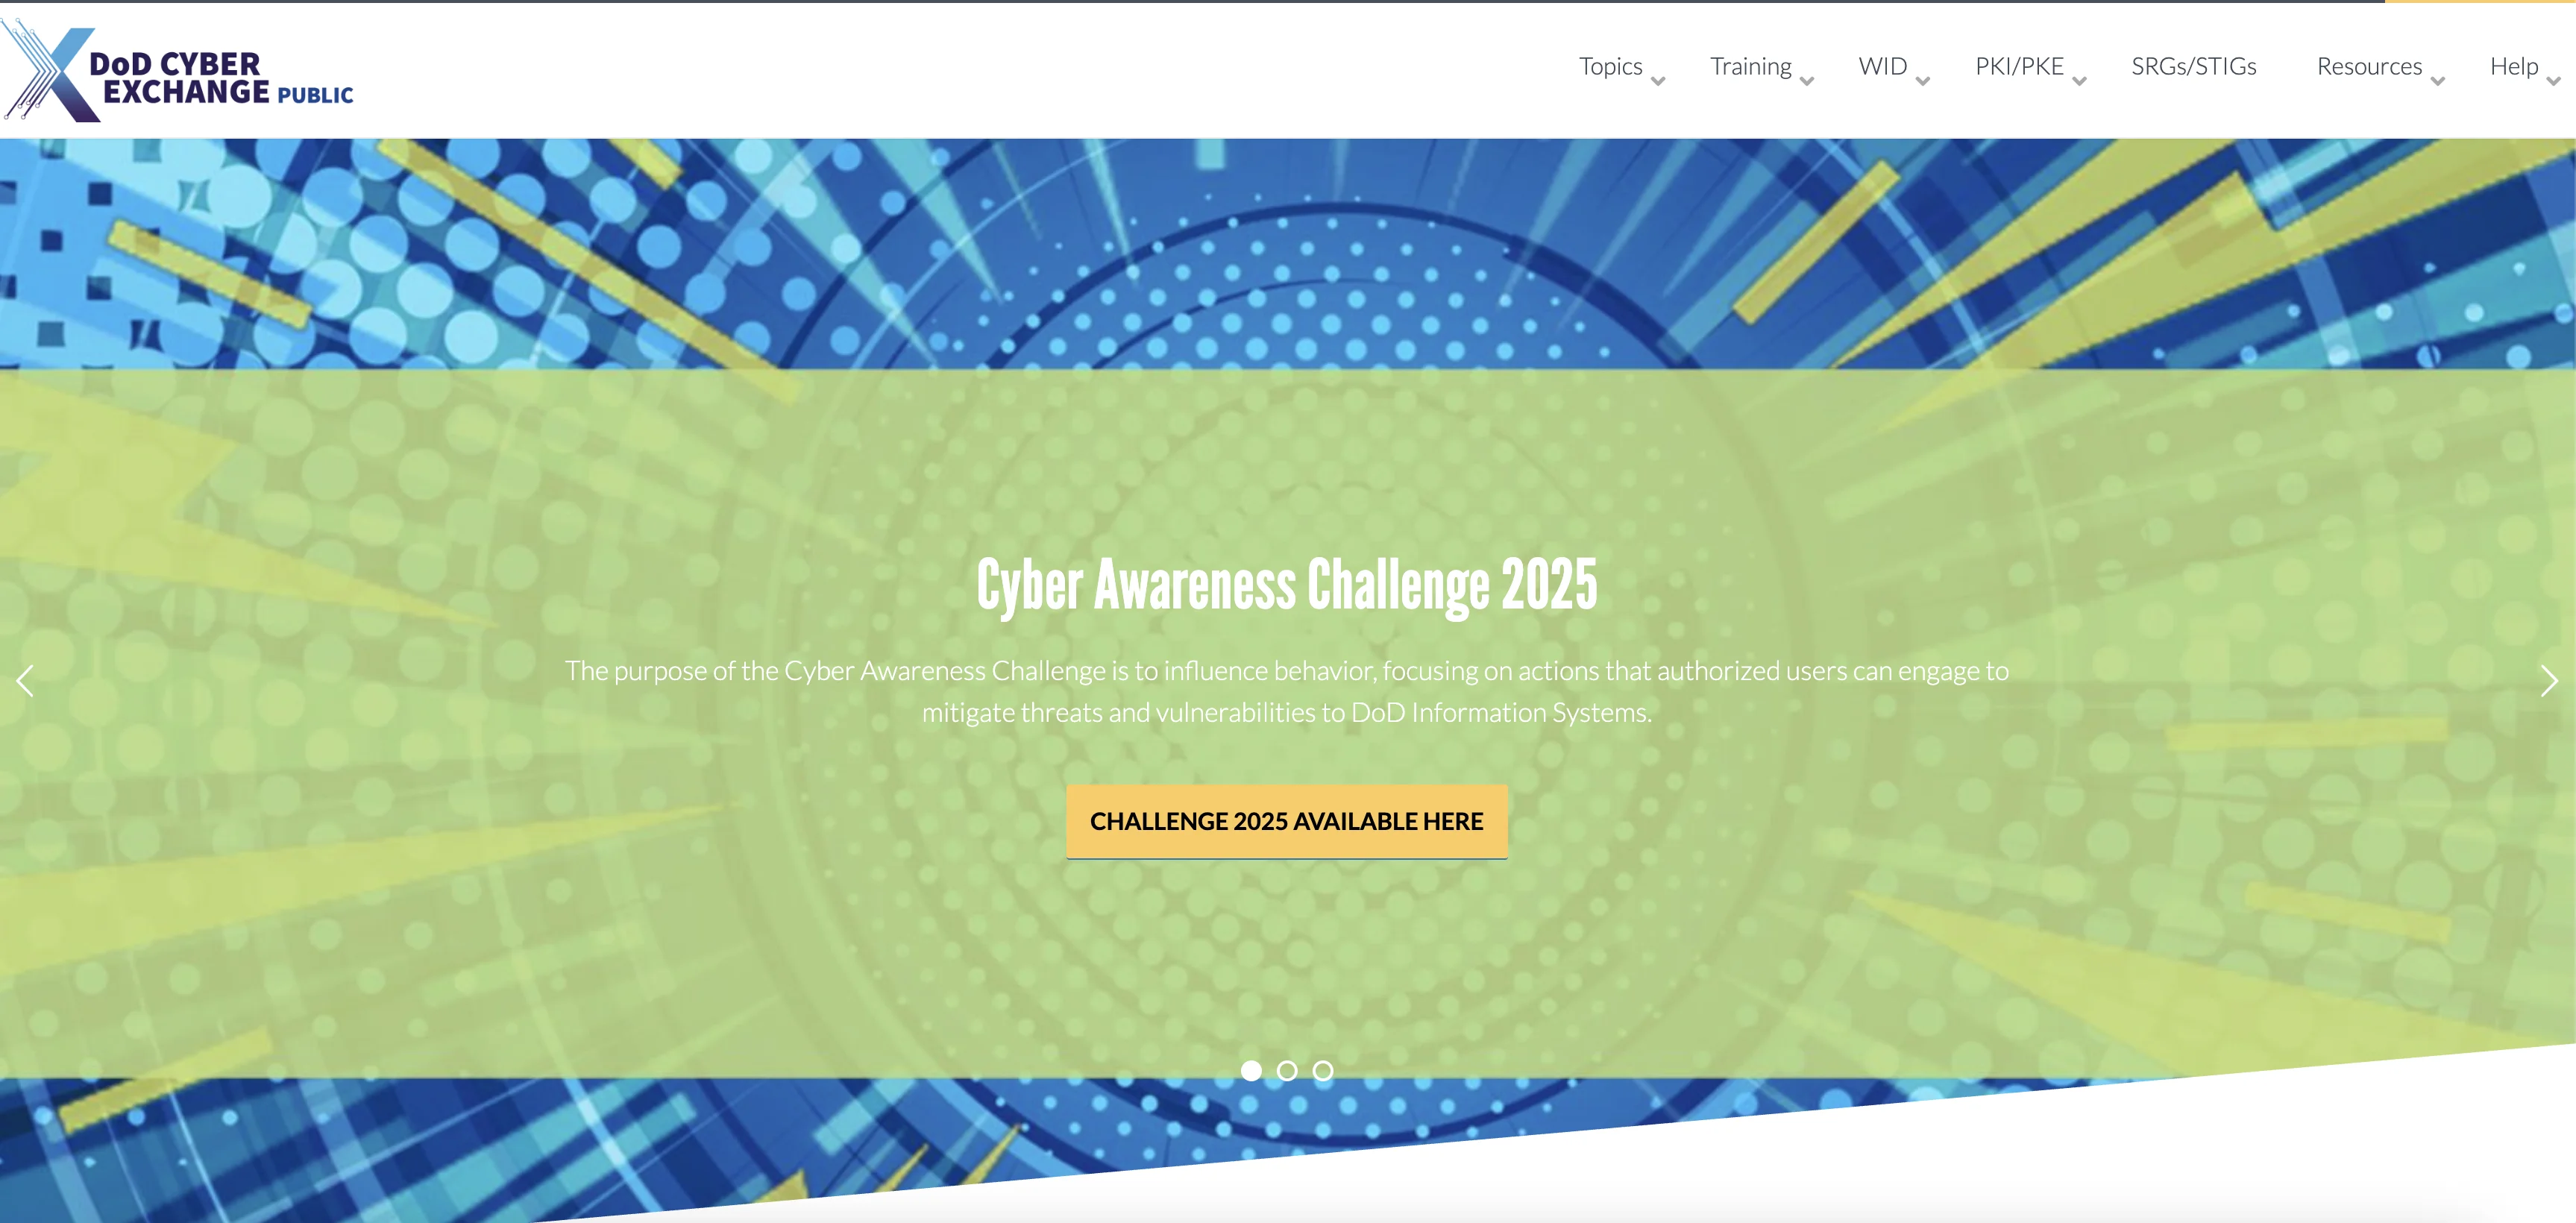
- Go to cyber.mil.
- Or, you can download here (official link from cyber.mil) then skip to step 2
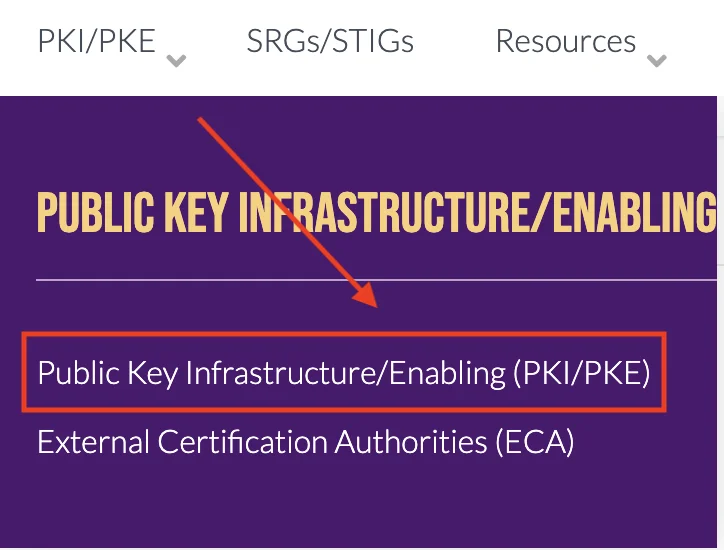
- In the top menu bar (right), select PKI-PKE.

- In the left side menu, click on Document Library.
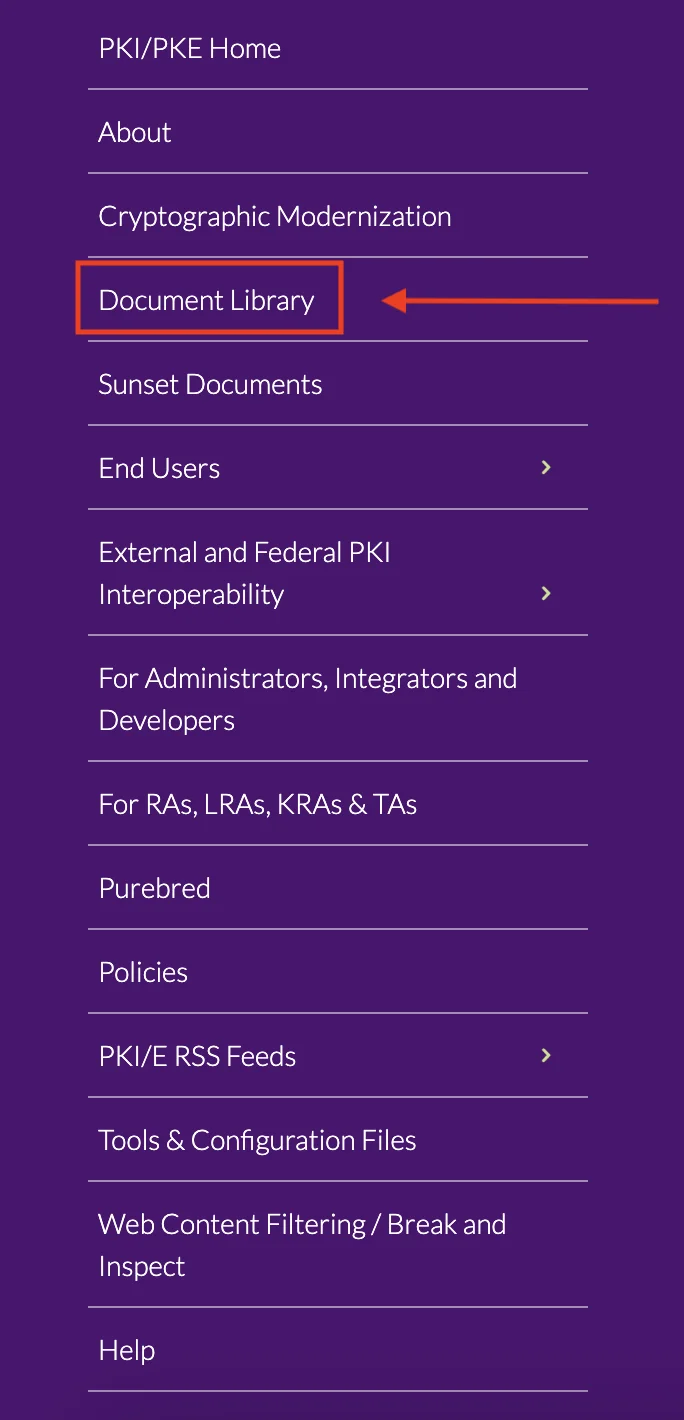
- Search for "DoD Approved External PKI Certificates Trust Chains".
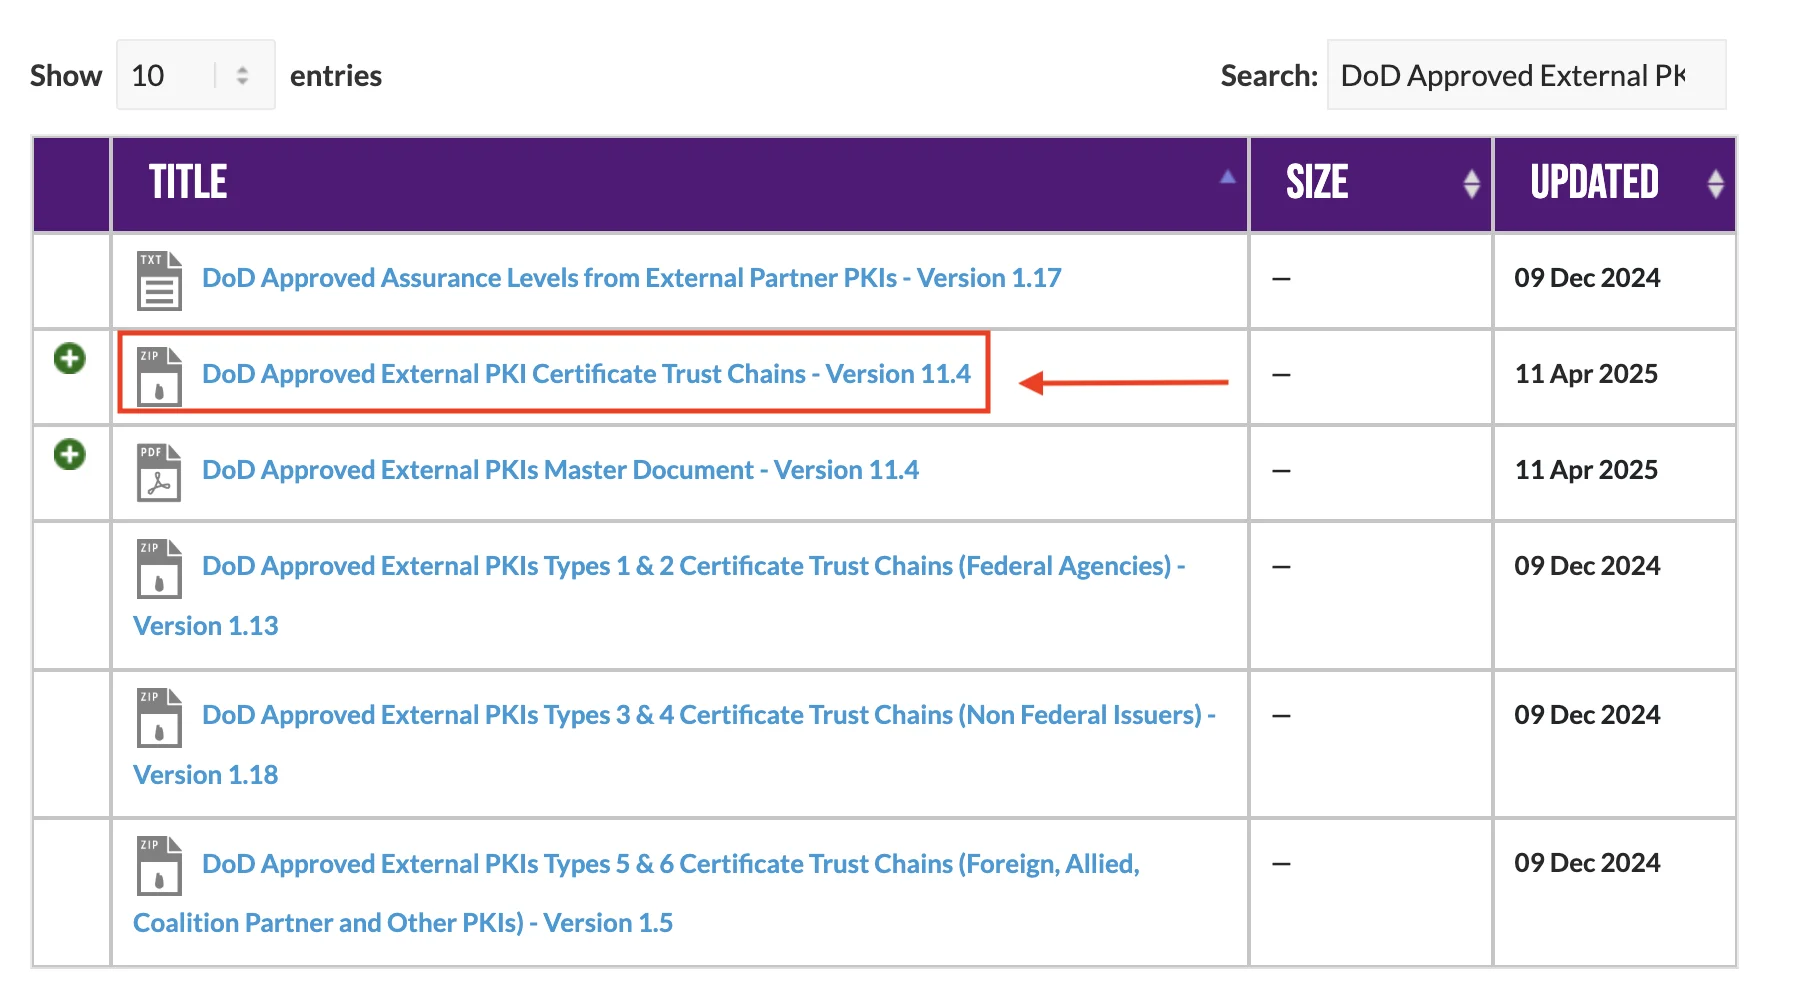
Step 2: Locate, Extract, and Explore the Certificates
- Find the downloaded ZIP file named
DoD_Approved_External_PKIs_Trust_Chains.zip
Where is my downloaded ZIP file?
(Click to expand and see example paths, helpful notes, and images in the tabs below)
(Click to expand and see example paths, helpful notes, and images in the tabs below)
By default, your downloaded file will be saved in your Downloads folder. However, you may have chosen a different location when saving the file—please check your browser's download settings or the location you selected.
- Example Path
- Example Image
/Users/YOURUSERNAME/Downloads/DoD_Approved_External_PKIs_Trust_Chains.zip

- Double-click the ZIP file to extract it to a folder named
DoD_Approved_External_PKIs_Trust_Chains_vXX.X_YYYYMMDD
Where did it extract?
(Click to expand and see example paths, helpful notes, and images in the tabs below)
(Click to expand and see example paths, helpful notes, and images in the tabs below)
When you extract the zip it will create a folder. By default, the extracted folder will appear in the same location as the ZIP file. If you use a third-party extraction tool or changed the extraction path, the folder may be located elsewhere—check your tool's settings or the location you selected.
- Example Path
- Example Image
/Users/YOURUSERNAME/Downloads/DoD_Approved_External_PKIs_Trust_Chains_vXX.X_YYYYMMDD/

- Open the extracted folder named
DoD_Approved_External_PKIs_Trust_Chains_vXX.X_YYYYMMDD
How to Open?
(Click to expand and see example paths, helpful notes, and images in the tabs below)
(Click to expand and see example paths, helpful notes, and images in the tabs below)
The extracted folder will be named DoD_Approved_External_PKIs_Trust_Chains_vXX.X_YYYYMMDD.
Locate this folder in your downloads (or chosen location) and double-click it to open and view its contents.
- Open the
_DoDfolder inside the extracted folder nameDoD_Approved_External_PKIs_Trust_Chains_vXX.X_YYYYMMDD
Where is the _DoD directory?
(Click to expand and see example paths, helpful notes, and images in the tabs below)
_DoD directory?(Click to expand and see example paths, helpful notes, and images in the tabs below)
The _DoD folder is located within the extracted DoD_Approved_External_PKIs_Trust_Chains_vXX.X_YYYYMMDD directory. Open the extracted folder and look for the _DoD directory as shown below.
- Example Path
- Example Image
/DoD_Approved_External_PKIs_Trust_Chains_vXX.X_YYYYMMDD/_DoD/

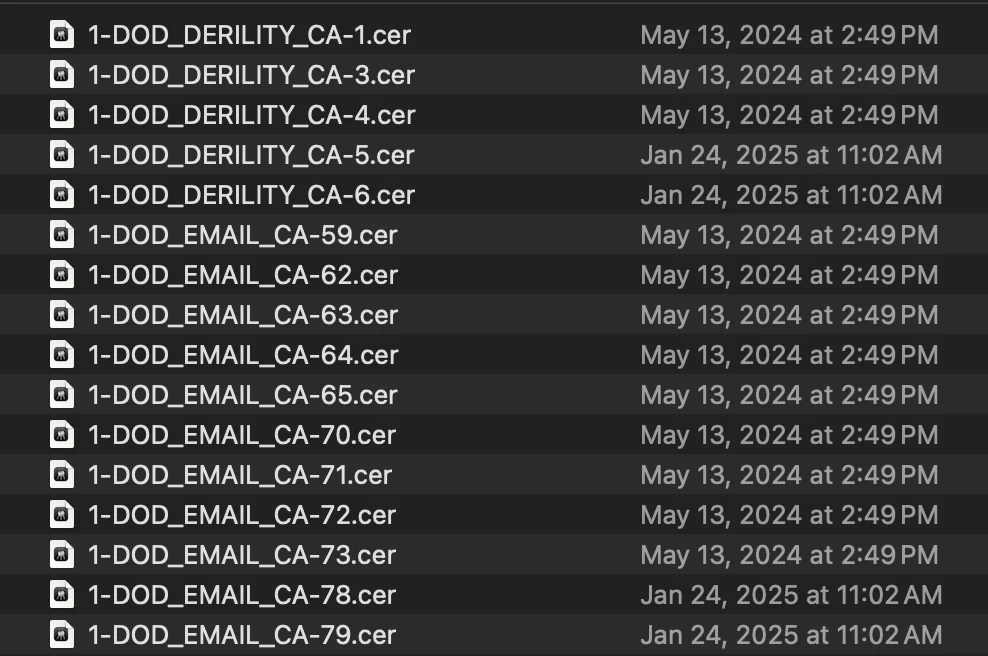
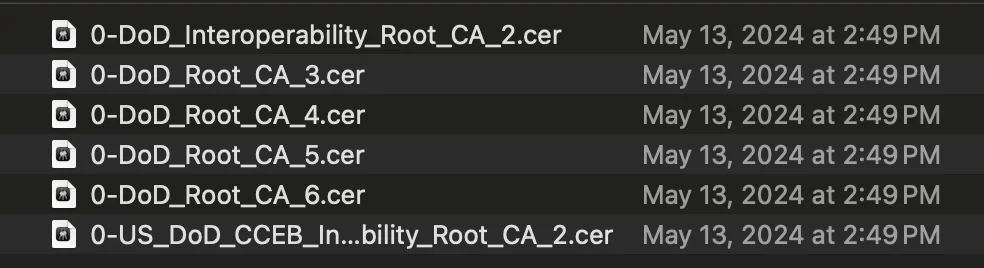
- Find/Verify the folders
Intermediate_and_Issuing_CA_Certs&Trust_Anchors_Self-Signedcontain CA's
Where are the certificate folders?
(Click to expand and see example paths, helpful notes, and images in the tabs below)
(Click to expand and see example paths, helpful notes, and images in the tabs below)
Inside the _DoD folder, you will find:
Intermediate_and_Issuing_CA_Certs(contains Intermediate CA certificates)Trust_Anchors_Self-Signed(contains Root CA certificates)
Each of these folders contains the certificate files (CAs) that you will import into your keychains.
- Example Path
- Example Image DoD
- Example Image Intermediate
- Example Image Root
Intermediate_and_Issuing_CA_Certs Path
/Users/YOURUSERNAME/Downloads/DoD_Approved_External_PKIs_Trust_Chains_v11.4_20250324/_DoD/Intermediate_and_Issuing_CA_Certs
Trust_Anchors_Self-Signed Path
/Users/YOURUSERNAME/Downloads/DoD_Approved_External_PKIs_Trust_Chains_v11.4_20250324/_DoD/Trust_Anchors_Self-Signed

Step 3: Import Certificates into Keychain
Now that you have located the certificates, you need to import them into your Mac's Keychain.
-
Open the Keychain Access app:
Click the magnifying glass (Spotlight) in the top right corner of your screen, type Keychain Access, and press Enter.
You may be prompted to enter your login password to open the app. -
Navigate to the correct keychain:
On the left side of the Keychain Access window, you will see several sections, including Login and System.-
Login Keychain:
Certificates imported here are only available to your user account. Other users on the same device will not have access to these certificates. -
System Keychain:
Certificates imported here are available to all users on the device. This is the recommended location for DoD certificates, especially if the device is used by multiple users or for organizational purposes.
-
For most users, it is best to import DoD certificates into the System Keychain to ensure they are trusted system-wide.
Importing the Certificates:
The .cer files you need to import are located inside the following folders:
Intermediate_and_Issuing_CA_Certs(for Intermediate CA certificates)Trust_Anchors_Self-Signed(for Root CA certificates)
Note: You may also see certificate files with
.crtor.pemextensions. These can be imported the same way as.cerfiles.
Tip: You can select and import multiple certificate files at once by selecting them all in Finder and dragging them into Keychain Access.
Admin Rights Required: Importing certificates into the System Keychain will prompt you for your administrator password.
Security Reminder: Only import certificates downloaded directly from official DoD or cyber.mil sources.
You can import these certificate files by either:
- Dragging and dropping them directly into the Login or System keychain in the Keychain Access window,
or - Double-clicking a certificate file, which will prompt you to choose which keychain (Login or System) you want to store the certificate in.
By default, newly imported Root CA certificates will not be trusted and will fail validation.
The next step is the most important step—without setting the trust level to "Always Trust" for Root CAs, the certificates will not function and your system will not trust DoD resources.
Step 4: Setting Trust Levels for Root CA Certificates
After importing, you may need to set the trust level for Root CA certificates to ensure your Mac trusts them for authentication.
Why is this important?
Root CA certificates must be explicitly trusted by your system.
If you do not set the trust level to "Always Trust" for Root CAs, your Mac may not recognize them as valid, and authentication with DoD resources will fail.
Setting the trust level ensures your system accepts the certificate chain and allows secure access to DoD sites and services.
Visual Examples:
Below is a table showing what a properly trusted Root CA certificate and a failed trust setting look like in Keychain Access, as well as the color difference between Root and Intermediate CAs:
| Good (Always Trust) Root CA | Failed Trust Root CA | Root CA (Orange) | Intermediate CA (Blue) |
|---|---|---|---|
| |
Color and Naming Guidance:
- Root CA certificates will appear orange in Keychain Access and typically have "Root" in their name.
- Intermediate CA certificates will appear blue.
- Only set "Always Trust" for the orange certificates that have "Root" in the name.
Do not set "Always Trust" for blue (Intermediate) certificates.
How to set a certificate to "Always Trust":
- In Keychain Access, locate the imported Root CA certificate (orange, with "Root" in the name).
- Right-click (or Control-click) the certificate and select Get Info.
- Expand the Trust section.
- Set When using this certificate to Always Trust.
- Close the window; you may be prompted for your password to confirm.
Example of a trusted certificate: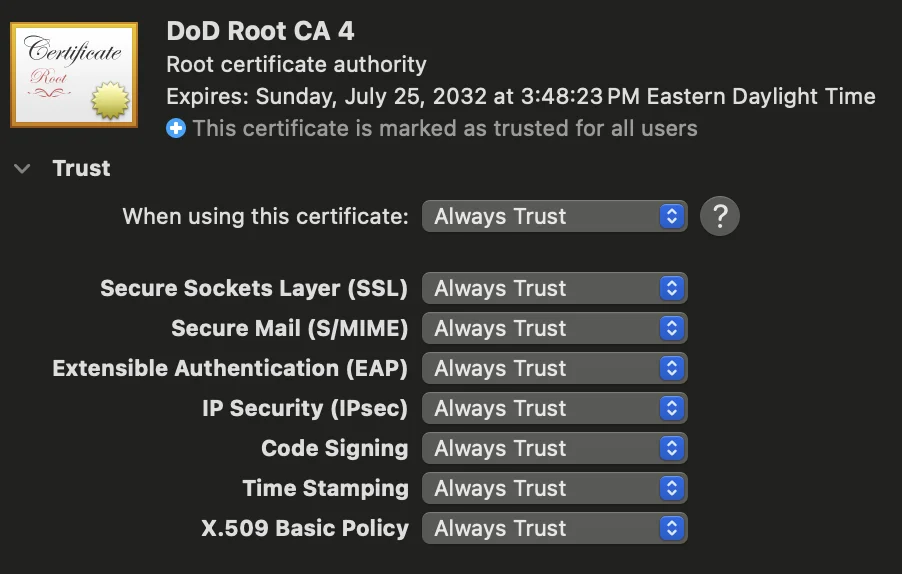 | Example of an untrusted certificate: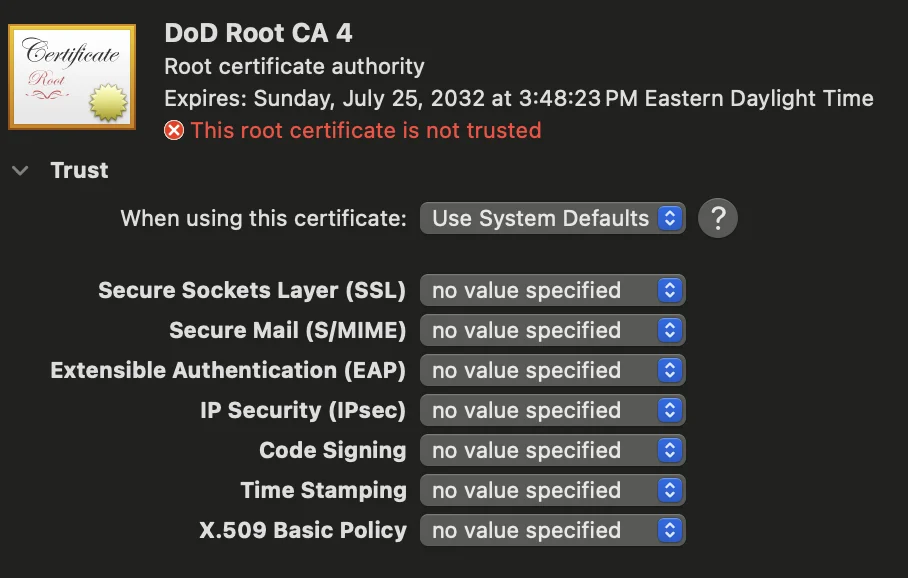 |
Step 5: Verify Installation
To ensure the certificates are correctly installed:
- Open the Keychain Access app again.
- Navigate to the Login or System keychain (wherever you imported the certificates).
- You should see the imported certificates listed there.
- For each certificate, you can check:
- The name should match the CA's name.
- The certificate should be valid (not expired or revoked).
You can also test the functionality that requires the DoD certificates (like accessing a DoD website) to verify that the installation was successful.
Example of a successful import:
Troubleshooting Steps
Trouble importing Certificates:
- Remove any existing DoD certificates from both the Login and System keychains before importing new ones.
- If your Login keychain is corrupt, it can prevent importing DoD certificates. In this case, reset the Login keychain (Keychain Access > Preferences > Reset My Default Keychain).
Old/Expired DoD Certificates:
- Remove any old or expired DoD certificates from your keychains.
- Old/expired certificates can override or conflict with newer certificates and cause trust issues.
Setting Trust Issues:
- If you have trouble setting trust or certificates are not being trusted, remove any existing DoD certificates and re-import the new ones.
- If problems persist, consider resetting your local keychain and then re-importing the certificates.
Script Fails or Permission Errors:
- Make sure you are running the script with
sudoand entering the correct local Mac password. - Ensure your user account has administrator privileges.
- If you see "Operation not permitted" errors, check your System Preferences > Security & Privacy > Privacy > Full Disk Access, and ensure Terminal (or your shell) is allowed.
Keychain Access Crashes or Freezes:
- Restart your Mac and try again.
- If the issue persists, consider resetting your keychains.
Certificates Still Not Trusted After Import:
- Double-check that you set the trust level to "Always Trust" for all Root CA certificates.
- Remove and re-import the problematic certificate, then set trust again.
Browser or Application Still Not Recognizing Certificates:
- Quit and reopen the browser or application.
- Try restarting your Mac after importing and trusting the certificates.
- Ensure the browser is set to use the system keychain (some browsers like Firefox use their own certificate store).
For any other issues, consult the documentation for Keychain Access or the support resources for your specific device and operating system version.
If you found an error, noticed something missing, or need additional help, please submit feedback on GitHub or start a GitHub discussion.
If you'd like to contribute improvements to this guide, feel free to submit a pull request or select edit this page below.