Certificate Import – User Guide
This guide is for users who need to install certificates—generally issued by a system administrator or IT department—from sources such as corporate, educational, or other trusted authorities, on their Mac.
This guide is designed for macOS Monterey and newer (typically the latest supported macOS versions). Older versions may require additional software or different steps. If you need a guide for an older version, please submit a request on GitHub Discussions.
Manual Method
To manually install the required certificates, you will download them from an authorized location, verify the files, import the certificates into your system keychain, and set the trust level for the Root CAs.
Step 1: Obtain Certificates from Your Organization or Authority
- Obtain the certificate files (
.cer,.crt, or.pem) from your organization's official website, IT department, or certificate authority. - Make sure you are downloading the correct and most up-to-date certificates required for your organization's resources.
- Only download certificates from trusted, official sources provided by your company or institution.
Step 2: Verify Certificate Files and Accepted Formats
- Locate the downloaded certificate files on your computer (typically in your Downloads folder, unless you specified another location).
- Accepted certificate file formats for Keychain Access include:
.cer.crt.pem
- If your certificates are in a ZIP file, extract them to access the individual certificate files.
- Double-check that you have all required certificates (Root CA and Intermediate CA, if applicable) as instructed by your organization.
Step 3: Import Certificates into Keychain
Now that you have located the certificates, you need to import them into your Mac's Keychain.
-
Open the Keychain Access app:
Click the magnifying glass (Spotlight) in the top right corner of your screen, type Keychain Access, and press Enter.
You may be prompted to enter your login password to open the app. -
Navigate to the correct keychain:
On the left side of the Keychain Access window, you will see several sections, including Login and System.-
Login Keychain:
Certificates imported here are only available to your user account. Other users on the same device will not have access to these certificates. -
System Keychain:
Certificates imported here are available to all users on the device. This is the recommended location for certificates, especially if the device is used by multiple users or for organizational purposes.
-
For most users, it is best to import certificates into the System Keychain to ensure they are trusted system-wide.
Importing the Certificates:
You can import certificate files with the extensions .cer, .crt, or .pem.
To import certificates, either:
- Drag and drop the files directly into the Login or System keychain in the Keychain Access window,
or - Double-click a certificate file, then choose which keychain (Login or System) to store the certificate in when prompted.
Note: All three file types (
.cer,.crt,.pem) are supported and can be imported the same way.Tip: You can select and import multiple certificate files at once by selecting them all in Finder and dragging them into Keychain Access.
Admin Rights Required: Importing certificates into the System Keychain will prompt you for your administrator password.
Security Reminder: Only import certificates downloaded directly from your organization's official sources.
By default, newly imported Root CA certificates will not be trusted and will fail validation.
The next step is the most important step—without setting the trust level to "Always Trust" for Root CAs, the certificates will not function and your system will not trust resources that require them.
Step 4: Setting Trust Levels for Root CA Certificates
After importing, you may need to set the trust level for Root CA certificates to ensure your Mac trusts them for authentication.
Why is this important?
Root CA certificates must be explicitly trusted by your system.
If you do not set the trust level to "Always Trust" for Root CAs, your Mac may not recognize them as valid, and authentication with some resources may fail.
Setting the trust level ensures your system accepts the certificate chain and allows secure access to sites and services.
Visual Examples:
Below is a table showing what a properly trusted Root CA certificate and a failed trust setting look like in Keychain Access, as well as the color difference between Root and Intermediate CAs:
| Good (Always Trust) Root CA | Failed Trust Root CA | Root CA (Orange) | Intermediate CA (Blue) |
|---|---|---|---|
 |  |
Color and Naming Guidance:
- Root CA certificates will appear orange in Keychain Access and typically have "Root" in their name.
- Intermediate CA certificates will appear blue.
- Only set "Always Trust" for the orange certificates that have "Root" in the name.
Do not set "Always Trust" for blue (Intermediate) certificates.
How to set a certificate to "Always Trust":
- In Keychain Access, locate the imported Root CA certificate (orange, with "Root" in the name).
- Right-click (or Control-click) the certificate and select Get Info.
- Expand the Trust section.
- Set When using this certificate to Always Trust.
- Close the window; you may be prompted for your password to confirm.
Example of a trusted certificate: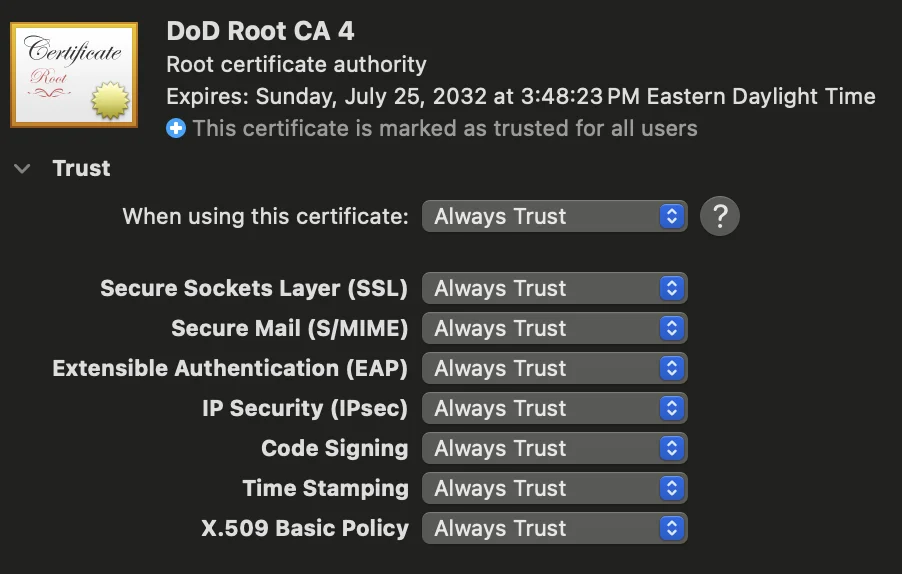 | Example of an untrusted certificate: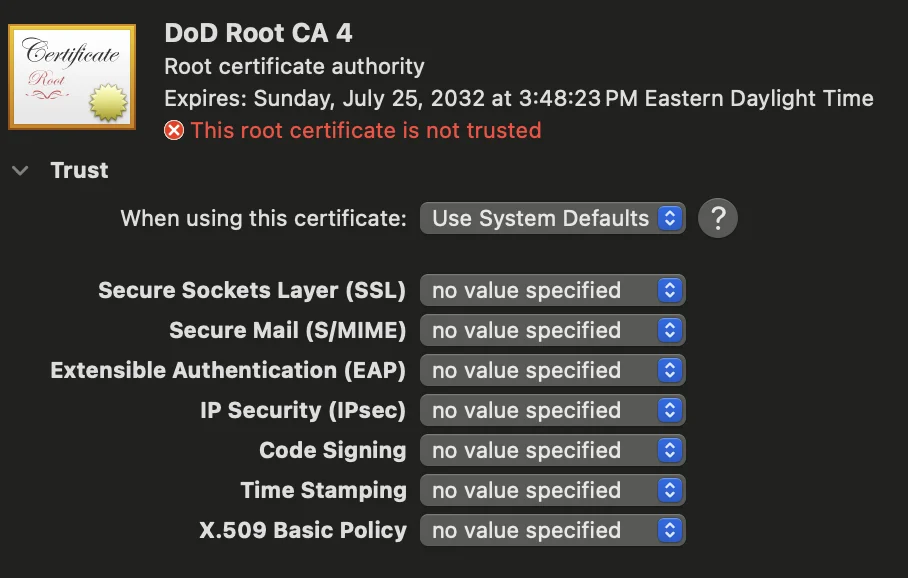 |
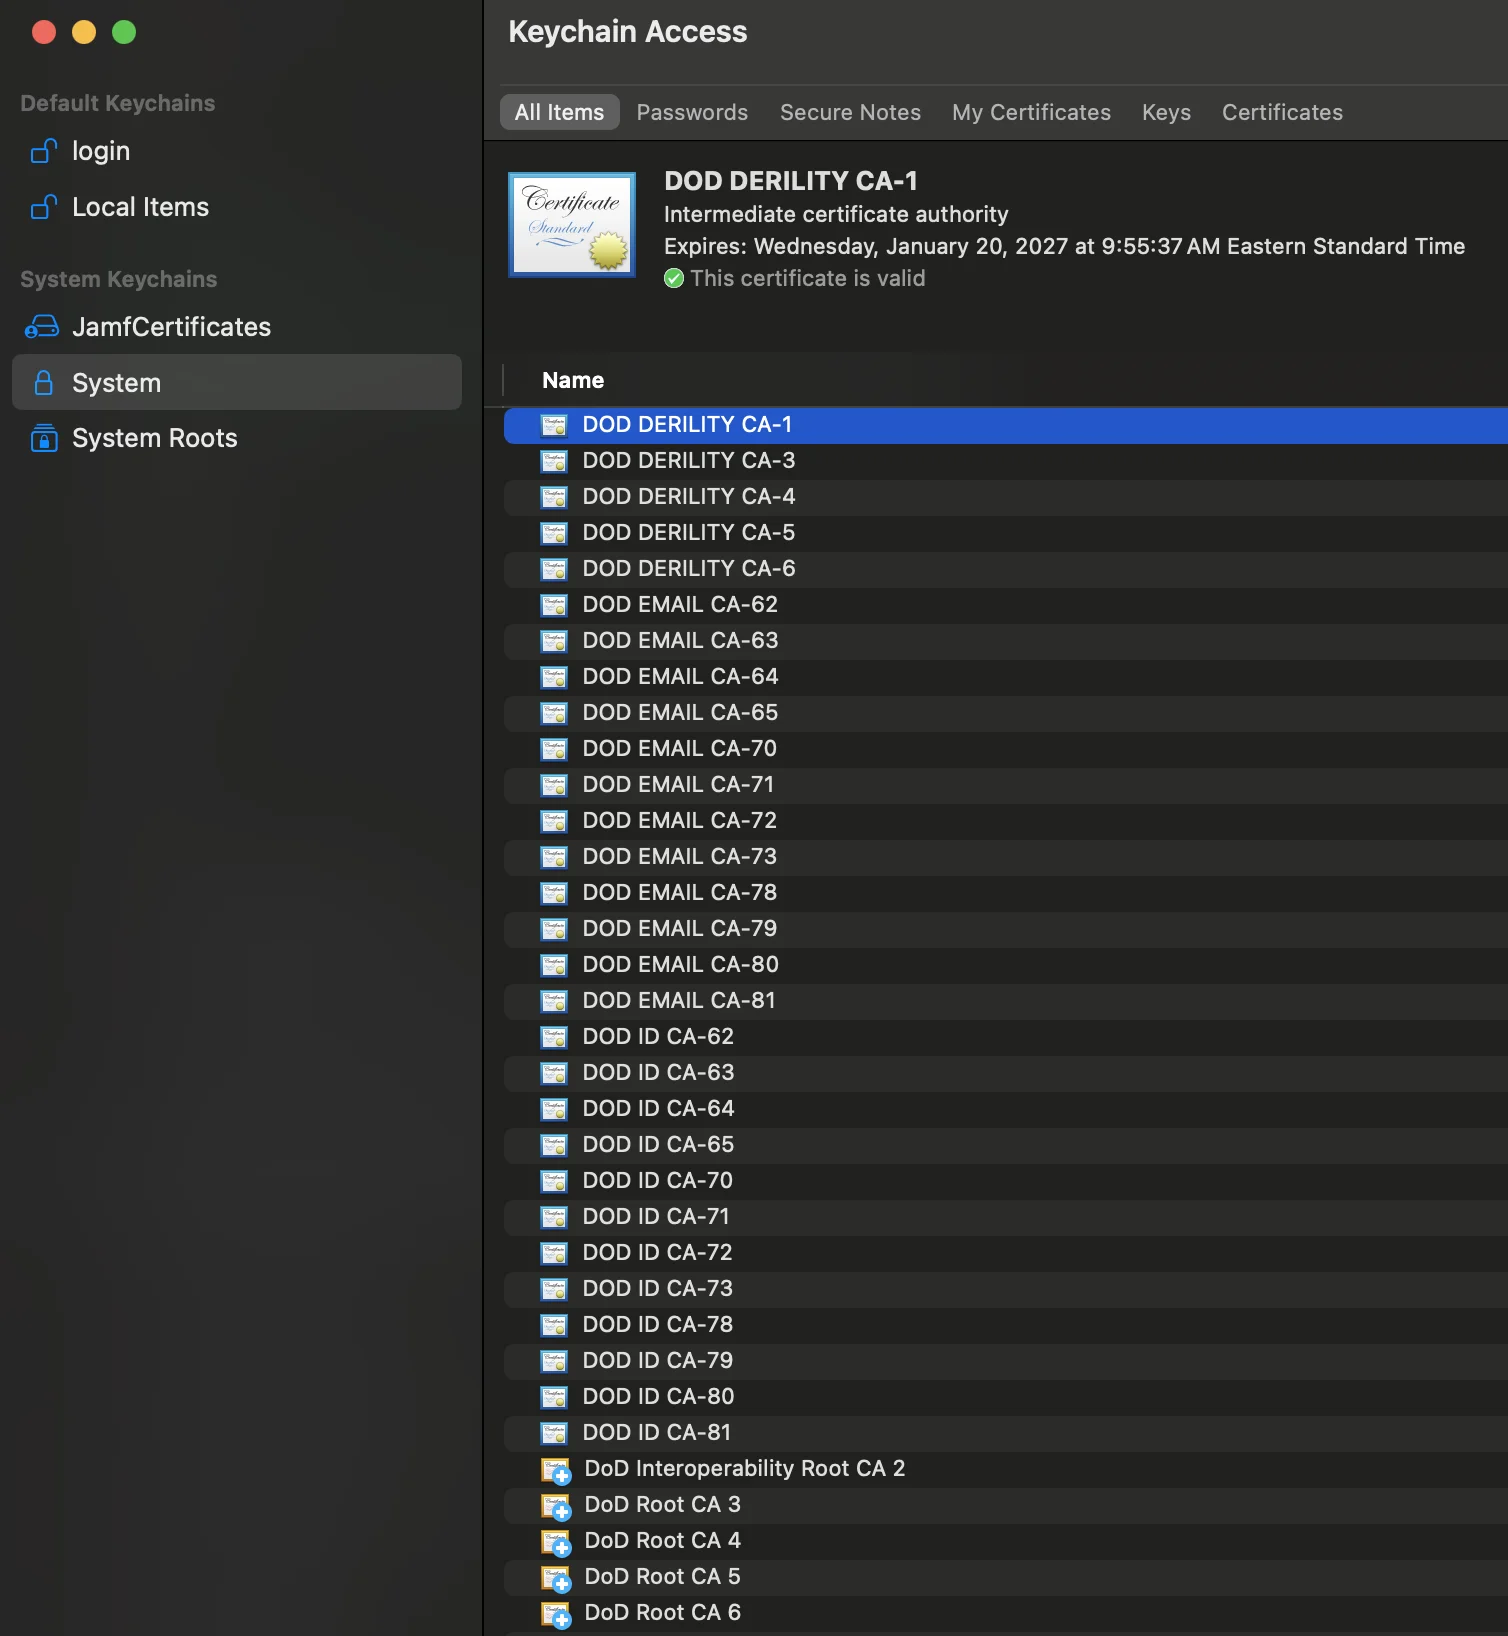
Step 5: Verify Installation
To ensure the certificates are correctly installed:
- Open the Keychain Access app again.
- Navigate to the Login or System keychain (wherever you imported the certificates).
- You should see the imported certificates listed there.
- For each certificate, you can check:
- The name should match the CA's name.
- The certificate should be valid (not expired or revoked).
You can also test the functionality that requires the certificates (like accessing a secure website or resource) to verify that the installation was successful.
Example of a successful import:
Troubleshooting Steps
Trouble importing Certificates:
- Remove any existing certificates from both the Login and System keychains before importing new ones.
- If your Login keychain is corrupt, it can prevent importing certificates. In this case, reset the Login keychain (Keychain Access > Preferences > Reset My Default Keychain).
Old/Expired Certificates:
- Remove any old or expired certificates from your keychains.
- Old/expired certificates can override or conflict with newer certificates and cause trust issues.
Setting Trust Issues:
- If you have trouble setting trust or certificates are not being trusted, remove any existing certificates and re-import the new ones.
- If problems persist, consider resetting your local keychain and then re-importing the certificates.
Keychain Access Crashes or Freezes:
- Restart your Mac and try again.
- If the issue persists, consider resetting your keychains.
Certificates Still Not Trusted After Import:
- Double-check that you set the trust level to "Always Trust" for all Root CA certificates.
- Remove and re-import the problematic certificate, then set trust again.
Browser or Application Still Not Recognizing Certificates:
- Quit and reopen the browser or application.
- Try restarting your Mac after importing and trusting the certificates.
- Ensure the browser is set to use the system keychain (some browsers like Firefox use their own certificate store).
For any other issues, consult the documentation for Keychain Access or the support resources for your specific device and operating system version.
If you found an error, noticed something missing, or need additional help, please submit feedback on GitHub or start a GitHub discussion.
If you'd like to contribute improvements to this guide, feel free to submit a pull request or select edit this page below.